Instalación y configuración de Wireguard
Vamos a instalar un servidor Wireguard en nuestro VPS.
# Instalamos wireguard y generador de qr para escanear desde app movil
sudo apt install wireguard qrencode -y

# Cambiamos a nuestro directorio de wireguard
sudo su
cd /etc/wireguard/
umask 077

# Generamos claves de servidor
wg genkey | tee /etc/wireguard/server.key | wg pubkey > /etc/wireguard/server.pub
Creamos nuestro fichero wg0.conf:
nano wg0.conf

[Interface]
# IP que tendrá el VPS dentro de la VPN
Address = 10.8.0.1/24
# Puerto de escucha (OJO - abrir el puerto en ufw y panel de nuestro vps si es necesario)
ListenPort = 51820
# Clave privada del servidor
PrivateKey = # GENERADA EN EL APARTADO ANTERIOR - FICHERO server.key

# Reglas para permitir que el tráfico fluya y salga a internet
#PostUp = iptables -A FORWARD -i %i -j ACCEPT; iptables -t nat -A POSTROUTING -o ens6 -j MASQUERADE
#PostDown = iptables -D FORWARD -i %i -j ACCEPT; iptables -t nat -D POSTROUTING -o ens6 -j MASQUERADE

# Reglas combinadas: Acceso a Internet (ens6) + Acceso a Tailscale (tailscale0)
PostUp = iptables -A FORWARD -i %i -j ACCEPT; iptables -t nat -A POSTROUTING -o ens6 -j MASQUERADE; iptables -A FORWARD -i %i -o tailscale0 -j ACCEPT; iptables -A FORWARD -i tailscale0 -o %i -m state --state RELATED,ESTABLISHED -j ACCEPT; iptables -t nat -A POSTROUTING -o tailscale0 -j MASQUERADE
PostDown = iptables -D FORWARD -i %i -j ACCEPT; iptables -t nat -D POSTROUTING -o ens6 -j MASQUERADE; iptables -D FORWARD -i %i -o tailscale0 -j ACCEPT; iptables -D FORWARD -i tailscale0 -o %i -m state --state RELATED,ESTABLISHED -j ACCEPT; iptables -t nat -D POSTROUTING -o tailscale0 -j MASQUERADE


# CLIENTES

# s24
[Peer]
PublicKey = # CLAVE PUBLICA DE NUESTRO CLIENTE S24
AllowedIPs = 10.8.0.2/32

# envy
[Peer]
PublicKey = # CLAVE PUBLICA DE NUESTRO CLIENTE ENVY
AllowedIPs = 10.8.0.3/32
Generamos las claves de nuestro primer cliente:
wg genkey | tee /etc/wireguard/s24.key | wg pubkey > /etc/wireguard/s24.pub
Fichero de configuracion del cliente:
nano s24.conf

[Interface]
# Clave privada del cliente s24
PrivateKey = # CLAVE PRIVADA DE s24 GENERADA EN EL PASO ANTERIOR FICHERO s24.key
Address = 10.8.0.2/24
#### OJO CON ESTO ######
# DNS = 1.1.1.1 # NETCUP es muy exigente con su firewall externo y no permite las consultas DNS. Un problema parecido he tenido en la configuración de AdguardHome
# Para hacer funcionar esta configuración de wireguard en mi vps de NetCUP tengo que comentar la línea de DNS, cuando estaba en piensasolutions no me hacía falta comentar la línea.

[Peer]
# Public key del servidor
PublicKey = # CLAVE PUBLICA DEL SERVIDOR FICHERO server.pub
Endpoint = IP_PUBLICA_VPS:51820
AllowedIPs = 0.0.0.0/0
Generamos el codigo qr para escanear con el movil:
qrencode -t ansiutf8 < s24.conf

Y listo. Con esto ya está configurado nuestro servidor y nuestro.
Arrancamos el servicio y lo habilitamos:
systemctl start wg-quick@wg0
systemctl enable wg-quick@wg0
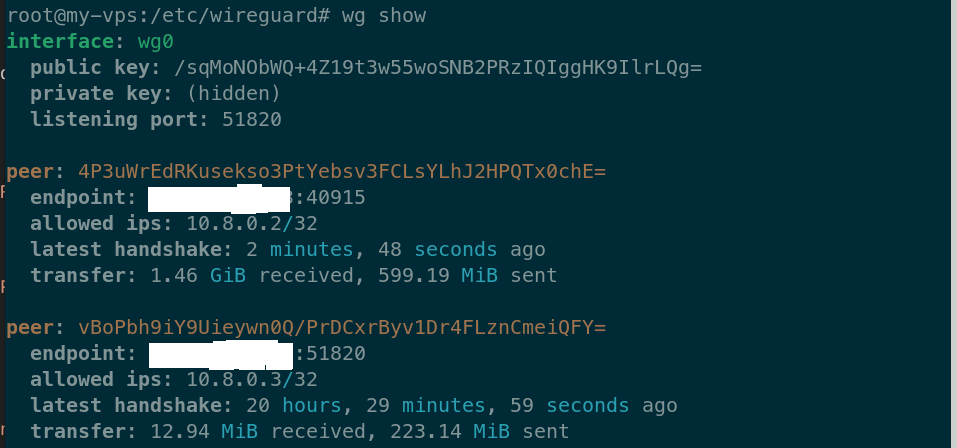
#Vemos el estado del servidor
wg show
Cuando actualicemos algún peer reiniciamos el servidor wireguard:
systemctl restart wg-quick@wg0
IMPORTANTE: Fichero wg0.conf no se puede borrar. Los ficheros .conf de los clientes no es necesarios conservarlos.Simplemente los creamos para generar luego el qr o para importarlos desde nuestro gestor de red de Gnome. RECORDAR actualizar nuestro fichero wg0.conf con cada cliente que añadimos.
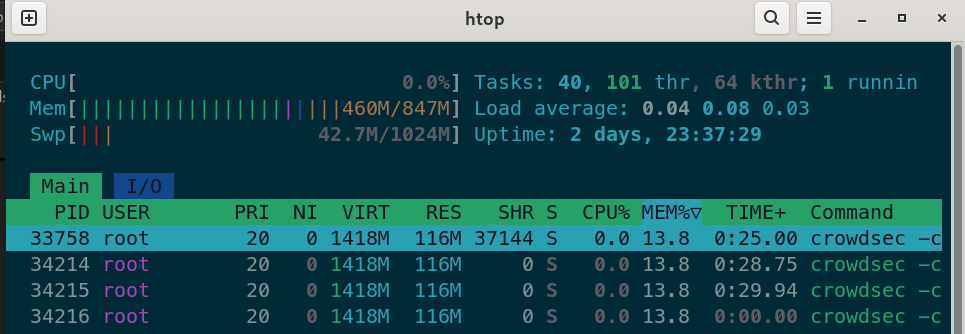
Ampliar la capacidad de RAM de nuestro VPS con swap
Nuestro VPS está muy escaso de RAM. Vamos a darle algo de margen aprovechando nuestro nvme y creando una swap de 1GB de tamaño.
Creación de nuestro fichero swap:
sudo fallocate -l 1G /swapfile
ls -la /

sudo chmod 600 /swapfile

sudo mkswap /swapfile

sudo swapon /swapfile

echo '/swapfile none swap sw 0 0' | sudo tee -a /etc/fstab
cat /etc/fstab

free -h

sudo sysctl vm.swappiness=20
htop
Backups remotos con Borgmatic
En este mismo blog, tengo una entrada con la configuración de borgmatic en mi NAS secundario de backups.
Vamos a hacer una mejora en la programación de los backups.
Debian 13 ya no usa cron para las tareas. Ahora usa systemd.
Instalación de borgmatic
# Instalación
sudo apt install borgmatic

# Generamos fichero de configuración
sudo generate-borgmatic-config
Editamos nuestro fichero de borgmatic:
sudo nano /etc/borgmatic/config.yaml

# Añadimos lo siguiente:
source_directories:
  - /home/usuario

repositories:
  # USAMOS NUESTRA IP DE TAILSCALE
  - path: ssh://borg@100.105.100.10:2222/./piensa
    label: piensa

exclude_caches: true
exclude_patterns:
  - '*.pyc'
  - /home/*/.cache


compression: auto,zstd
encryption_passphrase: PASS_SUPER_SECRETA
archive_name_format: "{hostname}-{now}"

# Usamos root porque hay directorios que solo tienen permisos de root (pe. en crowdsec)
ssh_command: ssh -i /root/.ssh/piensa
retries: 5
retry_wait: 5

keep_daily: 3
keep_weekly: 4
keep_monthly: 12

checks:
  - name: repository
    frequency: 4 weeks
  - name: archives
    frequency: 8 weeks

check_last: 3

apprise:
  states:
    - start
    - finish
    - fail

  services:
    - url: mailtos://smtp.gmail.com:587?user=SUPERUSUARIO@gmail.com&pass=SUPERSECRETA_PASS&from=SUPERUSUARIO@gmail.com&to=DESTINATARIO@gmail.com
      label: mail
    - url: tgram://BOT_TOKEN:xxxxxxxxxxxxxxxxxxxxxxxxxxxxxxxxxxxx/-ID_GRUPO_TELEGRAM/
      label: telegram

  start:
    title: ⚙️ Starrted Backup Piensa
    body: Starting backup process

  finish:
    title: ✅ SUCCESS Backup Piensa
    body: Backup Piensa success

  fail:
    title: ❌ FAILED Backup Piensa
    body: Backups Piensa failed
Con esto ya está configurado el backup de nuestros datos.
Ahora tenemos que verificar que la configuración sea correcta, iniciamos el repositorio de borg en el servidor remoto y hacemos el primer backup:
# Verificamos configuración
sudo env "PATH=$PATH" borgmatic config validate
# Iniciamos el repositorio
sudo env "PATH=$PATH" borgmatic init --encryption repokey-blake2
# Primer backup
sudo borgmatic create --list --stats
Vamos a programar los backups. En la web de borgmatic nos explica como hacerlo con tareas de systemd.
wget https://projects.torsion.org/borgmatic-collective/borgmatic/raw/branch/main/sample/systemd/borgmatic.service
wget https://projects.torsion.org/borgmatic-collective/borgmatic/raw/branch/main/sample/systemd/borgmatic.timer
sudo mv borgmatic.service borgmatic.timer /etc/systemd/system/
# Connfiguración de horario:
cd /etc/systemd/system
sudo nano borgmatic.timer

# Añadimos lo siguiente:
[Unit]
Description=Run borgmatic backup every day at 23:25:00

[Timer]
#OnCalendar=daily
OnCalendar=*-*-* 23:25:00
Persistent=true
RandomizedDelaySec=10m

[Install]
WantedBy=timers.target
Retocamos un par de cosas en nuestro fichero borgmatic.service
# Connfiguración de horario:
cd /etc/systemd/system
sudo nano borgmatic.service

[Unit]
Description=borgmatic backup
Wants=network-online.target
After=network-online.target
# Prevent borgmatic from running unless the machine is plugged into power. Remove this line if you
# want to allow borgmatic to run anytime.
#ConditionACPower=true
Documentation=https://torsion.org/borgmatic/

[Service]
Type=oneshot
RuntimeDirectory=borgmatic
StateDirectory=borgmatic

# Comentamos para que borgmatic no vaya al fichero borgmatic.pw a buscar las contraseñas
# Load single encrypted credential.
# LoadCredentialEncrypted=borgmatic.pw

LockPersonality=true
MemoryDenyWriteExecute=no
NoNewPrivileges=yes
PrivateDevices=yes
PrivateTmp=yes
ProtectClock=yes
ProtectControlGroups=yes
ProtectHostname=yes
ProtectKernelLogs=yes
ProtectKernelModules=yes
ProtectKernelTunables=yes
RestrictAddressFamilies=AF_UNIX AF_INET AF_INET6 AF_NETLINK
RestrictNamespaces=yes
RestrictRealtime=yes
RestrictSUIDSGID=yes
SystemCallArchitectures=native
SystemCallFilter=@system-service @mount
SystemCallErrorNumber=EPERM
ProtectSystem=full

CapabilityBoundingSet=CAP_DAC_READ_SEARCH CAP_NET_RAW

# Lower CPU and I/O priority.
Nice=19
CPUSchedulingPolicy=batch
IOSchedulingClass=best-effort
IOSchedulingPriority=7
IOWeight=100

Restart=no
LogRateLimitIntervalSec=0

# Delay start to prevent backups running during boot. Note that systemd-inhibit requires dbus and
# dbus-user-session to be installed.
ExecStartPre=sleep 1m

# En esta linea es importante indicar la ruta de nuestro borgmatic
# which borgmatic
ExecStart=systemd-inhibit --who="borgmatic" --what="sleep:shutdown" --why="Prevent interrupting scheduled backup" /usr/bin/borgmatic --verbosity -2 --syslog-verbosity 1
Por último, solo queda habilitar el nuevo servicio:
sudo systemctl enable --now borgmatic.timer
Verificamos la proxima ejecución:
systemctl list-timers borgmatic.timer

NEXT                        LEFT LAST                        PASSED UNIT            ACTIVATES
Fri 2026-03-06 23:30:33 UTC   7h Fri 2026-03-06 07:18:33 UTC 8h ago borgmatic.timer borgmatic.service

1 timers listed.
Pass --all to see loaded but inactive timers, too.
Con esto debería estar correctamente configurados los backus a nuestro servidor borg a través del cliente borgmatic.
Para verificar nuestros backups:
sudo borgmatic list
piensa: Listing archives
my-vps-2026-02-23T12:23:46           Mon, 2026-02-23 12:23:46 [f6508163e6c277ea7cbaf33db275ba2052d430d4538e4ca12161a9fec5ee5a06]
my-vps-2026-02-28T08:10:03           Sat, 2026-02-28 08:10:04 [c0fe77d566cc1db569e05c5ff9d7fc5d845e93b667373de24d86445891645945]
my-vps-2026-03-01T08:10:04           Sun, 2026-03-01 08:10:05 [87a15d7677e28c62fe143e28117652dc8ca9f08b230083a01047147eb0cea948]
my-vps-2026-03-02T23:25:04           Mon, 2026-03-02 23:25:05 [e4209a633f6a2f67cba38e3f4d6c481e6212cbcf76d0d2f79d22cc2c52d754e6]
my-vps-2026-03-03T00:51:39           Tue, 2026-03-03 00:51:40 [f1c31249f7c8ded0e7d289a593c78e146606934cd5a913fec9959e7268e88cea]
Restaurar el backup
Esta la parte más importante de los backups. He realizado varias pruebas y todo ha funcionado correctamente. Para restaurar el backup primero hacemos un listado de los que tenemos y después montamos el backup en la ubicación deseada para restaurar los ficheros:
Primero listamos los ficheros creados con borgmatic:
sudo borgmatic list
Una vez sabemos el fichero que nos interesa podemos ver el contenido:
sudo borgmatic list --archive server-2020-04-01
Extracción completa de ficheros:
sudo borgmatic extract --archive my_server-2025-07-30T04:24:04 --destination /mnt/new-directory
Extracción de una parte solamente:
sudo borgmatic extract --archive my_server-2020-04-01 --path mnt/catpics --destination /mnt/new-directory
Actualizaciones de seguridad automaticas
Instalamos paquetes necesarios:
sudo apt update && sudo apt upgrade
sudo apt install unattended-upgrades apt-listchanges -y
Configuración:
sudo nano /etc/apt/apt.conf.d/50unattended-upgrades

# Nos aseguramos que las lineas siguientes están descomentadas:

Unattended-Upgrade::Origins-Pattern {
        // Codename based matching:
        // This will follow the migration of a release through different
        // archives (e.g. from testing to stable and later oldstable).
        // Software will be the latest available for the named release,
        // but the Debian release itself will not be automatically upgraded.
//      "origin=Debian,codename=${distro_codename}-updates";
//      "origin=Debian,codename=${distro_codename}-proposed-updates";
        "origin=Debian,codename=${distro_codename},label=Debian";
        "origin=Debian,codename=${distro_codename},label=Debian-Security";
        "origin=Debian,codename=${distro_codename}-security,label=Debian-Security";
//      "o=Debian Backports,n=${distro_codename}-backports,l=Debian Backports";

# Limpieza de dependencias no usadas
// Do automatic removal of unused packages after the upgrade
// (equivalent to apt-get autoremove)
Unattended-Upgrade::Remove-Unused-Dependencies "true";


# Podríamos configurar reinicio automático, pero prefiero hacerlo después tras una notificación:
# Descomentaríamos esto:
// Unattended-Upgrade::Automatic-Reboot "true";

// Automatically reboot even if there are users currently logged in
// when Unattended-Upgrade::Automatic-Reboot is set to true
//Unattended-Upgrade::Automatic-Reboot-WithUsers "true";

// If automatic reboot is enabled and needed, reboot at the specific
// time instead of immediately
//  Default: "now"

# Aquí configuraríamos la hora del reinicio:
// Unattended-Upgrade::Automatic-Reboot-Time "02:00";
Configuramos el lanzador:
sudo nano /etc/apt/apt.conf.d/20auto-upgrades

# Añadimos lo siguiente:
APT::Periodic::Update-Package-Lists "1";
APT::Periodic::Download-Upgradeable-Packages "1";
APT::Periodic::AutocleanInterval "7";
APT::Periodic::Unattended-Upgrade "1";
Verificamos el correcto funcionamiento:
sudo unattended-upgrade --dry-run --debug
sudo cat /var/log/unattended-upgrades/unattended-upgrades.log

systemctl status unattended-upgrades
Notificaciones de actualizaciones
Notificaciones con las actualizaciones automáticas. Creamos los scripts de notificación.
Como unattended-upgrades envía correos electrónicos de forma nativa, pero no notificaciones Webhook/Push directamente, usaremos un script de “Post-Invoke”.
sudo nano /usr/local/bin/notify-updates.sh

# Añadimos lo siguiente:
#!/bin/bash

# Configuración
APPRISE_URL="tgram://11111111111111:XXXXXXXXXXXXXXXXXXXXXXXXXXXXXXXXXXXXXXXXXXXX/-5002897396/"
HOSTNAME=$(hostname)
REBOOT_FILE="/var/run/reboot-required"
REBOOT_PKGS="/var/run/reboot-required.pkgs"

# 1. Obtener paquetes (usamos una variable limpia)
LAST_UPGRADES=$(grep "Packages that were upgraded:" /var/log/unattended-upgrades/unattended-upgrades.log | tail -n 1 | cut -d: -f2)
[ -z "$LAST_UPGRADES" ] && LAST_UPGRADES="Ninguno (solo ajustes de seguridad)"

# 2. Lógica de reinicio
if [ -f "$REBOOT_FILE" ]; then
    ICON="⚠️"
    SUBJECT="REINICIO REQUERIDO - Piensa: $HOSTNAME"
    MSG_REBOOT="ATENCIÓN: Se requiere reiniciar el sistema."
else
    ICON="✅"
    SUBJECT="Actualización Exitosa - Piensa: $HOSTNAME"
    MSG_REBOOT="No es necesario reiniciar."
fi

# 3. Construir el cuerpo CON SALTOS DE LÍNEA REALES
# Importante: Las líneas vacías entre el texto mantienen el formato en Telegram
FINAL_BODY="$ICON Actualizaciones completadas en Piensa: $HOSTNAME.

Paquetes: $LAST_UPGRADES

$MSG_REBOOT"

# 4. Enviar (Apprise detectará los saltos de línea del shell)
apprise --title "$SUBJECT" --body "$FINAL_BODY" "$APPRISE_URL"
Como vemos en nuestro script el sistema nos avisa si es necesario reiniciar. En Debian, cuando apt instala un nuevo kernel, crea dos archivos temporales. El script simplemente mira si están ahí:
/var/run/reboot-required	#Su presencia indica que el sistema debe reiniciarse.
/var/run/reboot-required.pkgs	#Contiene la lista de paquetes que forzaron el reinicio (ej. linux-image-6.1...).
Hacemos el script ejecutable:
sudo chmod +x /usr/local/bin/notify-updates.sh
Creamos un nuevo archivo de configuración en APT para que ejecute el script justo después de que unattended-upgrades termine su tarea:
sudo nano /etc/apt/apt.conf.d/99apprise-notifications

# Añadimos lo siguiente:
Unattended-Upgrade::Post-Invoke { "/usr/local/bin/notify-updates.sh"; };
Pruebas:
sudo touch /var/run/reboot-required
/usr/local/bin/notify-updates.sh
sudo rm /var/run/reboot-required
En este punto nuestro sistema hace lo siguiente: 1.- Actualización diaria: unattended-upgrades hace el trabajo sucio.
2.- Post-Update: Recibimos un mensaje con los paquetes instalados y un aviso si hace falta reiniciar.
Ahora ya es decisión nuestra realizar el reinicio del sistema
Notificaciones de Servidor Online y espacio de almacenamiento
Ya que nos hemos puesto con las notificaciones, vamos a configurar las notificaciones para que una vez reiniciemos el sistema no informe que está operativo y otra para informar de poco espacio de almacenamiento. Mi VPS es muy modesto y esta última me vendrá muy bien en caso de problemas con el llenado del disco.
Creamos nuestro script:
sudo nano /usr/local/bin/notify-boot.sh

# Contenido:

#!/bin/bash
# Configuración
APPRISE_URL="tgram://2222222222:XXXXXXXXXXXXXXXXXXXXXXXXXXXXXXXXXXXXX/-5002897396/"
HOSTNAME=$(hostname)
UPTIME=$(uptime -p)

# Mensaje de sistema iniciado
SUBJECT="🚀 Servidor Online - Piensa: $HOSTNAME"
BODY="El sistema se ha iniciado correctamente.
Estado: $UPTIME
Fecha: $(date '+%Y-%m-%d %H:%M:%S')"

# Enviar notificación
/usr/bin/apprise --title "$SUBJECT" --body "$BODY" "$APPRISE_URL"
Permisos de ejecución:
sudo chmod +x notify-boot.sh
sudo nano /etc/systemd/system/notify-boot.service

# Contenido:
[Unit]
Description=Notificación de inicio por Apprise
After=network-online.target
Wants=network-online.target

[Service]
Type=oneshot
ExecStart=/usr/local/bin/notify-boot.sh
RemainAfterExit=yes

[Install]
WantedBy=multi-user.target
Cargamos el nuevo servicio y lo habilitamos:
sudo systemctl daemon-reload
sudo systemctl enable notify-boot.service
Prueba:
sudo systemctl start notify-boot.service
Vamos con la notificación de disco muy lleno:
sudo nano /usr/local/bin/check-disk.sh

# Contenido:

#!/bin/bash
# Configuración
APPRISE_URL="tgram://2222222222:XXXXXXXXXXXXXXXXXXXXXXXXXXXXXXXXXXXXX/-5002897396/"
THRESHOLD=10  # Porcentaje mínimo de espacio libre antes de avisar
HOSTNAME=$(hostname)

# Obtener el uso actual de la partición raíz (/)
CURRENT_FREE=$(df / --output=pcent | tail -1 | tr -dc '0-9')
FREE_SPACE_PERCENT=$((100 - CURRENT_FREE))

if [ "$FREE_SPACE_PERCENT" -le "$THRESHOLD" ]; then
    ICON="🚨"
    SUBJECT="ALERTA DE DISCO - $HOSTNAME"
    BODY="¡Poco espacio en disco detectado!

Espacio libre: $FREE_SPACE_PERCENT%
Uso actual: $CURRENT_FREE%

Se recomienda limpiar logs o paquetes antiguos antes de la próxima actualización."

    # Enviar notificación
    /usr/bin/apprise --title "$SUBJECT" --body "$BODY" "$APPRISE_URL"
fi
Permisos de ejecución:
sudo chmod +x check-disk.sh
Programación diaria con systemd timers:
sudo nano /etc/systemd/system/check-disk.service

# Contenido:
[Unit]
Description=Chequeo de espacio en disco para alertas Apprise
After=network-online.target

[Service]
Type=oneshot
ExecStart=/usr/local/bin/check-disk.sh

[Install]
WantedBy=multi-user.target
Creamos la Unidad de timer. Este archivo le dice a systemd cuando ejecutarlo:
sudo nano /etc/systemd/system/check-disk.timer

# Contenido:
[Unit]
Description=Ejecutar chequeo de disco diariamente

[Timer]
# Se ejecuta todos los días a las 08:30 AM
OnCalendar=*-*-* 08:30:00
# Añade un margen aleatorio de 5 min para no saturar si tienes muchos VPS
RandomizedDelaySec=300
Persistent=true # Si el VPS estaba apagado a las 08:30, el script se ejecutará inmediatamente en cuanto se encienda

[Install]
WantedBy=timers.target
Activamos el nuevo timer:
sudo systemctl daemon-reload
sudo systemctl enable --now check-disk.timer
Listado de timers activos en el sistema:
sudo systemctl list-timers
Logs de la última vez que se ejecutó el checkeo del disco:
sudo journalctl -u check-disk.service
Prueba para que nos avise por Telegram:
sudo nano /usr/local/bin/check-disk.sh
# Editamos nuestro script y modificamos la siguiente linea:
# Si nuestro disco está mas de un 10% lleno que nos avise:
THRESHOLD=90  # Porcentaje mínimo de espacio libre antes de avisar

# Y lanzamos nuestro script.
/usr/local/bin/check-disk.sh
Nos debería llegar una notificación a Telegram con el aviso.
Ejecución manual del checkeo del disco:
sudo systemctl start check-disk.service
Con todo esto, nuestro VPS nos notificará de los siguientes eventos:
Actualizaciones: Te avisa qué instaló.
Mantenimiento: Te avisa si el kernel cambió y toca reiniciar.
Supervivencia: Te avisa si el VPS arrancó tras un corte o reboot.
Prevención: Te avisa si se está quedando sin espacio en disco.
Fuentes y enlaces de interés que ayudaran a complementar esta guía:
Debo decir que en esta guía he tirado mucho de IA.
https://blog.lasnotasdenoah.com/posts/vps-proxy/
Instalación de traefik sin etiquetas
Crowdsec WAF - Appsec
Web oficial de borgmatic